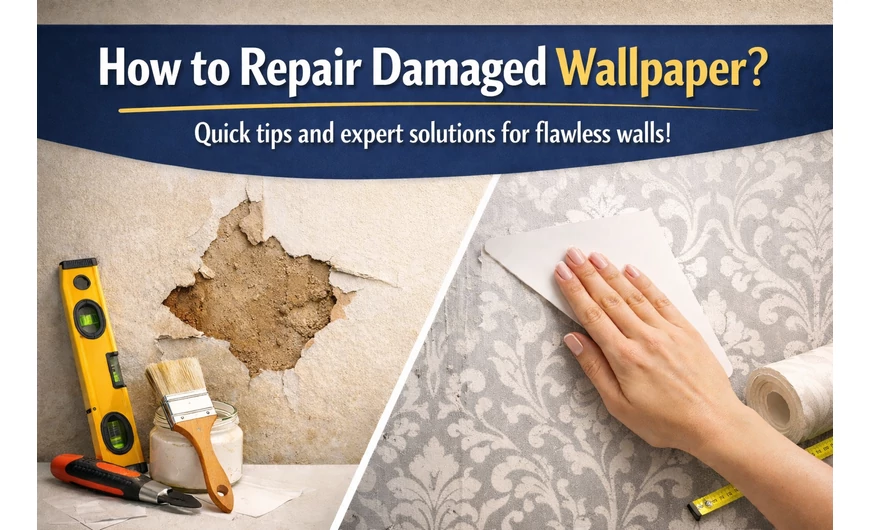
How to Repair Damaged Wallpaper?
Quick and easy solutions for the most common issues – a detailed guide to wallpaper repair so your wall can look unified, neat and aesthetically pleasing again.
Why is it worth dealing with wallpaper damage in time?
Wallpaper is not just a decorative element, but also one of the defining features of a room’s atmosphere. That is why even a small tear, peeling section or bubbling can easily disrupt the overall look of the interior. In many cases, the visible damage is only the beginning: if wallpaper repair is not carried out in time, the problem can spread and later require much more extensive intervention.
The good news is that repairing damaged wallpaper is usually not a complicated task. With the right tools, a bit of care, and the repair method best suited to the issue, it is often possible to achieve a beautiful result even without professional help. The goal is not only to make the wall look attractive again, but also to ensure that the repair remains durable.
What can cause wallpaper damage?
For the repair to be truly effective, it is worth first understanding what caused the issue. If the underlying cause remains, the problem may return within a short time, even if the surface itself has been repaired nicely for the moment.
Successful damaged wallpaper repair is therefore not only about hiding the visible flaw, but also about eliminating the underlying issue whenever possible.
What tools might you need for wallpaper repair?
Most minor repairs do not require any special equipment. A few basic tools and supplies are enough to carry out the work safely and neatly at home.
Repairing torn wallpaper step by step
Tearing is one of the most common issues, especially in high-traffic rooms or on wall sections where furniture is moved nearby. In this case, wallpaper repair will only look neat if the damaged edges are aligned back together as precisely as possible.

What should we do?
- Carefully clean the damaged area of dust and dirt.
- Align the torn edges to see exactly where they meet.
- Apply a thin layer of adhesive to the back of the damaged section.
- Press the wallpaper back into place, then smooth it from the center outward.
- Wipe away any excess adhesive with a slightly damp, soft cloth.
With patterned wallpaper, accurate pattern matching is especially important. Even a slight misalignment can be noticeable, so it is worth checking the exact position several times before bonding.
Reattaching peeling wallpaper
Peeling wallpaper most often appears along the edges or in the corners, and is frequently caused by humidity, improper adhesion or wall movement. The good news is that this is one of the easiest issues to repair if noticed in time.

Repair process
- Carefully lift the loose section of wallpaper so it does not tear further.
- Clean the wall and the back of the wallpaper from dust.
- Apply the appropriate amount of adhesive to the affected area.
- Smooth the wallpaper back into place, making sure no air bubbles remain underneath.
- Use a soft roller or cloth to work the surface for better adhesion.
Damaged wallpaper repair in this case can often be completed in just a few minutes, and if the cause of the peeling is also eliminated, the result can remain durable in the long term.
Repairing bubbling wallpaper
Bubbling usually occurs when air or moisture becomes trapped underneath the wallpaper. While it may seem annoying at first, smaller bubbles can often be removed quite easily and almost without a trace.

How should we repair it?
- Make a very small hole in the center of the bubble.
- Inject a small amount of adhesive through the opening.
- Gently smooth the surface so the air and excess adhesive can escape.
- Wipe away the remaining adhesive and allow the surface to dry.
The smaller the damage and the better the condition of the wallpaper, the less visible the repair will be. Quick action makes a big difference here as well.
When does partial replacement help?
Sometimes the damage is already too extensive to be corrected with simple reattachment or local repair. In such cases, replacing a smaller section of wallpaper can be a good solution, especially if some spare material from the original wallpaper is still available.
Steps of partial replacement
- Cut out the damaged area in a regular shape.
- Cut a new piece from the leftover wallpaper with the same pattern.
- Match the pattern and size precisely.
- Apply the new piece and smooth it carefully into place.
This method is particularly useful in the case of stains, deeper damage or larger tears. If the pattern is aligned correctly, the repair can be surprisingly discreet.
Why is vinyl wallpaper often easier to repair?
Vinyl wallpapers are popular for a reason: they are more durable, more resistant, and better able to withstand minor everyday wear. This is also an advantage when it comes to repairability.
Vinyl wallpaper repair is therefore often simpler and delivers a more attractive result, especially where durability and easier maintenance are important.
When is it no longer worth trying to repair it?
Although wallpaper repair can be an effective solution in many cases, there are situations where full replacement offers a more aesthetic and long-lasting result. In such cases, repair would only be a temporary fix or would remain too noticeable.

How can wallpaper damage be prevented?
Prevention is always easier than repair afterwards. With a few conscious decisions, the likelihood of needing damaged wallpaper repair again later can be significantly reduced.
Summary
Wallpaper repair can be completed quickly and effectively in the case of most minor issues if we respond in time and choose the right solution for the type of damage. Whether it is a tear, peeling edge or bubbling, careful work can often save the entire wall covering.
Repairing damaged wallpaper can be more cost-effective than a full replacement, while also helping preserve the unity and well-kept appearance of the interior. The key is careful preparation, using the right tools, and addressing not only the symptom but also the cause of the problem.